> For the complete documentation index, see [llms.txt](https://nishanthkp.gitbook.io/tableu/llms.txt). Markdown versions of documentation pages are available by appending `.md` to page URLs; this page is available as [Markdown](https://nishanthkp.gitbook.io/tableu/chapter-2/connecting-to-data-in-the-cloud-exercise-1.md).
# Connecting to data in the cloud Exercise 1
Certain data connections are made to data that is hosted in the cloud. These include **Amazon RDS**, **Google BigQuery**, **Microsoft SQL Azure**, **Snowflake**, **Salesforce**, **Google Drive**, and many others. It is beyond the scope of this book to cover each connection in depth, but as an example of a cloud data source, we’ll consider connecting to a Google Sheets document stored on Google Drive.
Google Sheets allows users to create and maintain spreadsheets of data online. Sheets may be shared and collaborated on by many different users. Here, we’ll walk through an example of connecting to a sheet that is shared via a link.
To follow the example, you’ll need a free Google account. With your credentials, follow these steps:
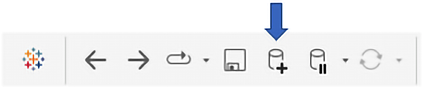
1. Click the **Add new data source** button on the toolbar, as shown here:
Figure 2.12: The add data button
1. Select **Google Drive** from the list of possible data sources. You may use the search box to quickly narrow the list **Google Sheets**.
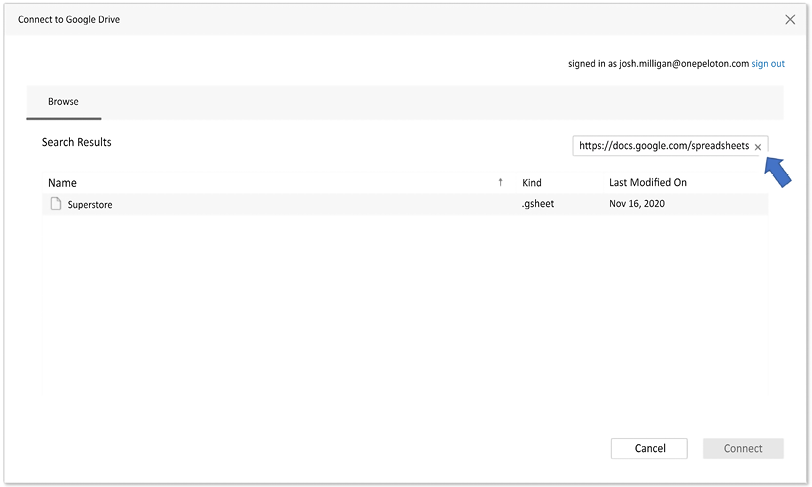
2. On the next screen, sign in to your Google account and allow Tableau Desktop the appropriate permissions. You will then be presented with a list of all your Google Sheets, along with preview and search capabilities, as shown in the following screenshot:
Figure 2.13: When connecting, you may browse the contents of Google Drive. In this example, paste the shared URL into the search box
3. Enter the following URL (for convenience, it is included in the `Chapter 02 Starter` workbook in the **Connect to Google Drive** tab, and may be copied and pasted) into the search box and click the **Search** button: .
4. Select the resulting `Superstore` sheet in the list and then click the **Connect** button. You should now see the **Data Source** screen.
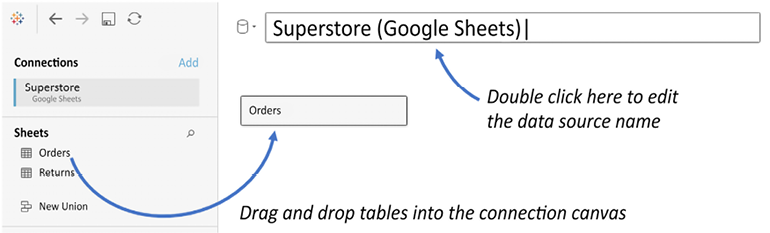
5. Drag the **Orders** sheet into the connection window.
6. Click the **Data Source** name to rename it `Superstore (Google Sheets)`:
Figure 2.14: Renaming a data source
1. For the purpose of this example, switch the connection option from **Live** to **Extract**. When connecting to your own Google Sheets data, you may choose either **Live** or **Extract**:
Figure 2.15: Switch between Live and Extract, edit extract options, and add filters
1. Click the tab for the **Connect to Google Sheets** sheet. You will be prompted for a location to save the extract. Accept the default name and save it in the `Learning Tableau\Chapter 02` directory (selecting **Yes** to overwrite the existing file if needed). The data should be extracted within a few seconds.
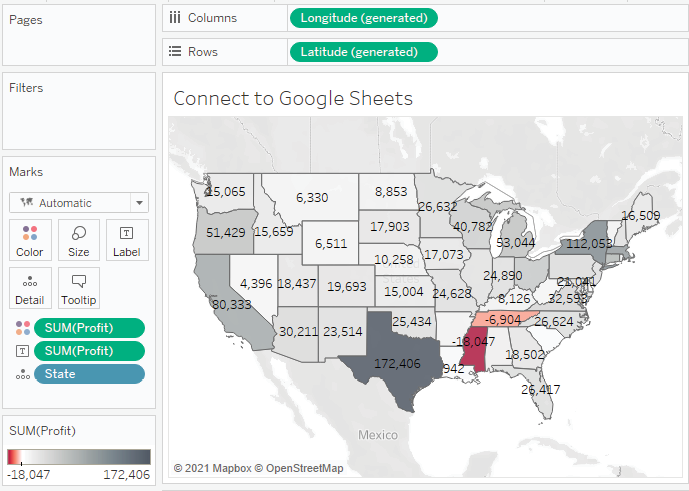
2. Create a filled map of **Profit** by **State**, with **Profit** defining the **Color** and **Label**:
Figure 2.16: The filled map demonstrates the ability to connect to a cloud-based data source
If your location is outside the United States, you may need to change your regional settings for Tableau to properly show the states on the map. Use the menu and select **File** | **Workbook Locale** | **More** and select **English (United States)**.
Now that we’ve seen a few specific examples of connecting to data, let’s consider some shortcuts and how to manage our data sources.